
Features
Noust is packed with advanced features designed to streamline your note-taking and technical documentation workflow. This guide provides a detailed look at how these features work and how you can customize them for your specific needs.
Section Management
Think of Sections as organized workspaces or browser tabs for different projects, topics, or workflows.
Workflow Organization
Group related notes into isolated sections to keep your focus sharp. Each section maintains its own independent history, allowing for isolated experimentation across different tasks without affecting the rest of your workspace.
Workspace Reordering
Reorganize your workspace by clicking and holding a section, dragging it nexus first, then moving it horizontally to snap it into a new position. Double-click any section name to edit it instantly.
The Atlas
Accessible via the Atlas button, this central hub provides a bird's-eye view of your entire workspace hierarchy. It allows for high-level organization, multi-section overview, and rapid data retrieval.
- Deep Search: Search through titles, content, or both using the toggle buttons in the search input.
Pro Tip: Custom Flags
Since search is literal, you can create your own tagging system by adding flags like
#Vuln,#Task, or@FollowUpanywhere in your note content to find them instantly later.
- Contextual Previews: When searching by content, a 2-line snippet of the matching text appears below the title to provide instant context.
- Hashtag Analytics & Counter:
- Hashtag Counter: When searching for a hashtag (e.g.
#tag), a real-time badge appears next to the search input displaying the total number of times that hashtag repeats across all notes in the workspace. - Analytics Panel: Click the chart icon to open the Hashtag Analytics slide-out panel, displaying interactive horizontal bar charts representing the ranking of most frequent hashtags. Clicking any hashtag in the list automatically filters your notes by that tag.
- Hashtag Counter: When searching for a hashtag (e.g.
- Note Management:
- Rename: Click a note's title to edit it directly.
- Move: Drag and drop notes between different sections to reorganize your workflow.
- Delete: Remove notes instantly using the trash icon.
- Section Management:
- Rename: Click a section title to rename the entire tab.
- Reorder: Drag section groups to change their order in the workspace.
- Delete: Remove entire sections (and all contained notes) with a single click.
- Visibility: Toggle the horizontal section tabs at the top of the window on or off. Hiding the section tabs is highly recommended if you use the Outline Sidebar, as it removes redundant tabs and frees up vertical workspace space.
Configuration
The behavior and layout of the Atlas and Section Tabs can be customized in Settings > Behavior under the Notes Overview Manager section.
Atlas & Section Tabs Settings
- Atlas Grid Layout: Adjust how many columns are displayed in the Atlas view.
- Show Subsections: Toggle whether subsection titles are indexed in the list.
- Section Tabs: Toggle whether horizontal section tabs are displayed in the header. Disable this to gain more vertical canvas area.
Workspace Navigation
The workspace is a dynamic 2D canvas that provides infinite room for your ideas.
Panning & Navigation
Hold the Left Mouse Button on any empty area of the background to "grab" and move the entire workspace. For a more fluid experience, Noust provides a Free Canvas Drag mode:
- Hold Mode (Default): Hold Alt while dragging with the Left Mouse Button to pan from anywhere, even when your cursor is positioned over a note or a button.
- Toggle Mode: Press Alt once to activate free canvas dragging (similar to an aim toggle in FPS games), and press it again to deactivate. While active, clicking and dragging anywhere moves the canvas. A single click without dragging inside a note places the text caret normally, while dragging an individual note requires deactivating the free drag mode.
You can configure the Free Drag behavior (Hold vs. Toggle) under Settings > Behavior.
You can also use Alt + Mouse Wheel Scroll to zoom in and out of the canvas, making it easier to navigate large workloads. Use Alt + Left Click to reset the zoom to 1:1 and center the view at the clicked location (or center a note if clicking on one). Alternatively, you can use the keyboard shortcuts Alt + W / A / S / D to pan the canvas viewport by one page or target area.
Alt Key Conflict (Linux/Unix users)
If your operating system uses the Alt key to move or drag windows (common in several Linux window managers), the canvas zoom feature may be interrupted. To resolve this, follow these steps:
- Open your Window Manager Tweaks (or Desktop Environment accessibility settings).
- Go to Accessibility.
- Set "Key used to grab and move windows" to None.
Outline Sidebar Atlas
For a persistent structural view of your workspace, you can enable the Outline Sidebar under Settings > Behavior (under the Notes Overview Manager section).
Unlike the central Atlas modal (which operates as a temporary popup), the Outline Sidebar docks to the left side of the canvas. It provides a fixed, collapsible tree representation of the entire workspace layout:
- Hierarchical Layout: Shows all sections, subsections (horizontal bookmarks), clusters, and notes in a compact vertical list with guide lines.
- Instant Actions:
- Active Note Highlighting: Automatically highlights the note that is currently active or focused on the canvas.
- Fuzzy Search Filter: Quickly filter nodes by name or content using the search bar at the top of the sidebar.
- Expand/Collapse Controls: Click the chevron icons to collapse or expand sections and clusters to keep your view organized.
- Interactivity: Clicking any section title switches active tabs. Clicking notes, clusters, or horizontal bookmarks immediately pans and centers the canvas on those elements. Pressing
Escapewhile focused or hovered over the sidebar closes it instantly. - Trigger Modes: Configure how the sidebar is revealed under Settings:
- Hover (Default): Automatically slides open when you hover over the left edge of the screen, and collapses when you move the mouse away (after a 300ms delay).
- Manual: Explicitly opened/closed by clicking the peek handle or using shortcuts.
- Keyboard Shortcuts & Gestures:
- Toggle the sidebar instantly with
Alt+E. - In Hover Mode, opening the sidebar via
Alt+Ewill pin it open, preventing it from auto-closing when the mouse leaves. It remains fixed until manually toggled or closed.
- Toggle the sidebar instantly with
Dynamic Auto-Scroll & Auto-Zoom
When moving notes across your workspace, Noust employs an intelligent, content-aware auto-zoom system designed to match your navigation needs based on workspace occupancy and movement intent:
- 3 Dynamic Zoom Stages:
- Stage 1 (Local Adjustment): A gentle zoom-out when crossing screen boundaries, ideal for positioning notes near edges or adjacent clusters without losing fine context.
- Stage 2 (Section Traversal): A wider, balanced perspective that engages when moving notes continuously toward active content across your section.
- Stage 3 (Global Panorama): A comprehensive bird's-eye view for traversing large, populated workspaces from end to end.
- Intent-Driven Activation: The camera dynamically transitions through zoom stages based on user intent—applying deliberate movement and sustained pressure past screen boundaries when destination content exists ahead.
- Content-Aware Protection: If you drag a note toward empty areas with no content ahead, deeper zoom stages are prevented and friction is applied to keep you oriented.
- Confined Space Optimization: When a note occupies a large portion of available screen space, the engine immediately provides a broader vantage point to maintain effortless visibility and control.
- Seamless Landing: Upon releasing the note, the canvas smoothly restores your previous zoom scale and intelligently repositions the viewport around the note's new location.
Configuration
You can fine-tune the auto-scroll physics in Settings > Behavior.
Auto-Scroll Settings
- Drag Auto-Zoom: Toggle whether the canvas automatically zooms out during note dragging to show the destination.
- Edge Threshold: Define the distance (in pixels, maximum 200px) from the screen edge where the standard auto-scroll begins to engage (kept at 40px, but fully customizable up to 200px).
- Max Speed: Set the maximum pixel-per-frame velocity the canvas can reach when pushing a note against the screen boundary (increased from 15 to 40 for faster navigation).
Cinematic Scroll Navigation
Navigating massive workspaces using your mouse wheel or trackpad now features a physics-based friction and inertia engine that transforms fast scrolling into a smooth, cinematic flight.
- Inertia-Triggered Zoom: Give your scroll wheel or trackpad a strong, intentional flick. The engine detects this burst of velocity and automatically pulls the canvas back to a 60% macro zoom, giving you a bird's-eye view of the landscape as you travel.
- Centered Flight Path: Unlike standard zooming which follows the cursor, the cinematic scroll anchors strictly to the center of your monitor. This provides a stable, predictable trajectory, making it effortless to track incoming clusters of notes.
- Content-Aware Protection: The macro zoom only engages if your workspace is expansive and there is actual content in your scroll direction. It will never eject you into an empty void.
- Auto-Landing Mechanism: The engine monitors your resting state. Once your scrolling pauses for 400 milliseconds, the camera gracefully "lands," smoothly interpolating back to your exact preferred zoom level before the flight began.
Configuration
You can customize the cinematic scroll auto-zoom behavior in Settings > Behavior.
Scroll Auto-Zoom Settings
- Scroll Auto-Zoom: Toggle whether the canvas automatically zooms out during rapid scrolling.
Discrete Zoom Levels
For precise control over your vantage point, you can enable Discrete Zoom Levels. When enabled, manual zooming (using Alt + Mouse Wheel Scroll) snaps strictly to predefined, custom steps rather than zooming continuously.
When Discrete Zoom is active, switching sections or loading the app will automatically initialize the view at your configured Zoom Base Level instead of 100%, preserving your preferred default working scale.
Configuration
You can toggle and customize these steps in Settings > Behavior:
Discrete Zoom Settings
- Discrete Zoom: Toggle to enable or disable the discrete step zoom logic.
- Zoom Max Level (%): The maximum manual zoom level (min: 10%, max: 100%, default: 100%). Focus actions (
Alt+ Click, Anchor navigation) will not exceed this limit. - Zoom Base Level (%): The default starting zoom level (min: 10%, max: 90%, default: 80%) used when opening workspaces or resetting the view.
- Zoom Macro Level (%): The zoom level optimized for reading clusters of notes (min: 10%, default: 50%).
- Zoom Overview Level (%): The zoom level for subsection overview (min: 10%, default: 35%).
- Zoom Global Level (%): The zoom level for a bird's-eye panoramic view of the entire section (min: 10%, default: 15%).
- Focus Zoom: Select the target zoom level applied when focusing on a note (
Alt+ Click) or jumping to the Anchor (Max,Base, orKeep).
NOTE
Validation & Constraints: To keep the navigation hierarchy coherent, each consecutive zoom level must be at least 10 percentage points lower than the level above it. If a configured setting violates this gap, the settings panel automatically adjusts and clamps the adjacent levels to preserve this constraint.
Auto-Expansion Logic
When you drag a note or resize it towards the boundaries, Noust dynamically creates more space to prevent you from being trapped by the initial section size. When notes are released, the section automatically shrinks to fit the notes' footprint, eliminating wasted space.
Configuration
You can fine-tune how the workspace expands and how navigation behaves in Settings > Behavior.
Navigation Settings
- Section Expansion: Define the amount of pixel space added whenever the section grows.
- Expansion Trigger: Set the "Auto Scroll Zone" distance from the viewport edges that triggers the automatic expansion behavior.
- Minimap Enabled: Toggle the visual mini-map at the bottom-right corner for quick orientation.
- Canvas Panning Mode: Choose between two specialized behaviors for the Alt + W/A/S/D keyboard shortcuts:
- Smart (Default): Dynamically scans the workspace in the direction of movement, automatically centering and framing note groups to avoid cutting off contents.
- Static: Reverts to a standard fixed movement where the viewport is panned by exactly one full screen size.
The Mini-Map
Located at the bottom-right corner, the Mini-Map provides a scaled-down representation of your entire section. It highlights the current viewport position and the location of all notes, representing them as dots.
- Fast Navigation: Click anywhere on the Mini-Map to instantly center the canvas on that location.
- Orientation: It dynamically resizes based on the bounding box of all your notes, ensuring you never lose track of isolated information in large sections.
- Customization: If you prefer a cleaner interface, the Mini-Map can be completely disabled in Settings > Behavior.
Workspace Anchor (Smart Positioning)
Set a primary "home base" in each section to navigate large workspaces instantly.
- Interaction: A draggable target icon represents your home base. Position it anywhere to define your primary origin point. Alternatively, hold
Alt+Right Clickanywhere on the canvas or mini-map to instantly move the anchor to that location. - HUD Indicator: A floating display at the bottom-left tracks your distance from the anchor, acting as a navigation compass.
- Return Home: Press
Alt+Xor click the HUD button to instantly return to your anchor. - Smart Dragging: While dragging the anchor, the Mini-Map becomes fully visible, showing a real-time preview of the area that will be framed. This allows for pixel-perfect positioning without trial and error.
Configuration
You can customize the anchor's positioning logic and settings in Settings > Behavior.
Anchor Settings
- Session Anchor: Toggle the visibility of the anchor element and the navigation HUD.
- Anchor Mode: Choose between two specialized behaviors:
- Smart Framing (Default): Automatically detects and frames the group of notes nearest to the anchor, aligning them to the top-left of the viewport.
- Classic Center: Reverts to a standard fixed alignment where the viewport is centered precisely on the anchor's position.
Workspaces & Cross-Tab Synchronization
Noust provides a powerful multi-workspace architecture combined with flexible cross-tab synchronization:
- Independent Workspaces: Create and switch between distinct workspaces to organize separate projects, clients, or contexts. Each workspace maintains its own isolated canvas notes, sections, Nexus documents, topology graphs, environment variables, and cloud sync links.
- Native Background Auto-Save: Local persistence is continuous, automatic, and always-on. Every edit, note movement, and structural change is asynchronously saved to IndexedDB in the background, eliminating manual save anxiety and preventing data loss.
- Cross-Tab Sync (Event Storage): In Settings > Behavior, you can enable or disable real-time synchronization across multiple open browser tabs:
- Enabled (Default): Edits and workspace switches made in one window are broadcast in real-time across all other active tabs via Event Storage / BroadcastChannel, keeping all windows perfectly mirrored.
- Disabled (Multi-Workspace Multi-Tasking): When Cross-Tab Sync is turned off, each browser tab operates as an independent session. This allows you to open different workspaces side-by-side in separate tabs or windows simultaneously without cross-tab interference, while background auto-save ensures data across all workspaces remains safely persisted.
Nexus & Chronos (Multi-Pane Workspace)
The Nexus system transforms Noust from a standard 2D canvas into a powerful multi-pane documentation engine. It allows you to view your chronological history alongside multiple long-form free-text pages in a resizable, side-by-side layout.
Opening the Workspace
Click the Nexus icon in the main toolbar to toggle the split-pane view. By default, it opens the Chronos — a centralized, bird's-eye view of your entire engagement's timeline.
Chronos
The Chronos is a high-level chronological aggregator. It scans every note in your current section and extracts all Chronology Blocks, presenting them in a unified, searchable timeline.
- Unified Timeline: See exactly when every piece of information was added or updated across all notes in the section.
- Search by Date: Use the search box to filter the timeline by day, month, year, or even a specific time (e.g., typing
Today,01/05/2026 06:15,01/05or/05/). - Toggle Sorting: Switch between Most Recent First (default) and Oldest First using the sort button in the header.
- Interactive Snippets: Click any item in the Chronos to expand it and see the full original content.
- Click-to-Copy: Hover over any entry and click the clipboard icon to instantly copy the precise ISO timestamp for your reports.
Free-Text Pages
Beyond standard canvas notes, Nexus allows you to maintain independent, long-form pages. These pages are ideal for structured reports, findings summaries, or detailed technical procedures.
- Markdown Support: Nexus free-text pages support a subset of Markdown for technical structure:
# Heading 1,## Heading 2,### Heading 3for titles.```(Triple Backticks) for immediate Code Blocks.
- Code Blocks: Specialized containers for technical data, code snippets, or logs.
- Auto-Conversion: Typing three backticks (
```) instantly transforms the line into a code block. - Selection Wraps: Select any text and use the "Code Block" button in the toolbar to wrap it in a block container.
- Auto-Conversion: Typing three backticks (
- Formatting Toolbar: A compact formatting toolbar appears when editing a free-text page. It supports converting lines to
H1,H2,H3headers, and includes a Normal Text button to quickly clear header formatting and revert blocks back to standard paragraphs. - Full Editing: Enjoy the same powerful list-making, checkbox, and toggle block capabilities as standard notes, but in a focused, document-like interface.
- Inline Images & Annotation: Paste images directly into documents. Selecting an image displays a floating toolbar to adjust its alignment (Left, Center, Right) or resize it dynamically. Standard inline images are fully integrated with the drawing manager, allowing you to use a vector annotation toolbar (freehand sketch, arrows, shapes, custom colors) to draw directly on the image.
- Chronology Integration: Track the evolution of your documentation directly within free-text pages. Both Manual Mode (
Alt+T) and Automatic Mode are fully supported — when Auto Chronos is active, timestamped blocks are created automatically as you type, exactly like in standard notes. Click the clock icon in the page header to toggle the inline timeline view: timestamps appear as compact markers in the left margin of the page, with hover highlighting and a delete button on each marker. - Page Margin Customization: When using the paginated page-view mode, you can customize page boundaries for both editing and PDF export using the margin toggle button (page icon with dashed borders):
- Standard Margins (Recommended): Enabled by default, this applies a professional, reader-optimized margin of
10mm 25mmin A4 size. This layout is highly recommended for standard reporting as it ensures perfect text alignment, optimal readability line length, and consistent visual styling. - Browser Custom Margins: Disabling margins removes the
@pagestyling override and expands the page container to full width (100%). This is extremely practical as it returns complete formatting control to the user, allowing you to configure custom margins (such as minimal, none, or custom widths) directly in your browser's native print dialog.
- Standard Margins (Recommended): Enabled by default, this applies a professional, reader-optimized margin of
- Global Page Search: A real-time search input under the
PAGESsection in the Nexus sidebar filters both folders and documents in real time.- Dynamic Scopes: Searches against folder names, document titles, and purified text content of documents.
- Context Awareness: Folders containing matching documents are automatically kept visible and temporarily expanded during searches.
- Blade-Style Expansion: When the sidebar is collapsed, the search bar is represented by a compact icon button. Clicking it expands the sidebar and focus-selects the search input instantly.
Multi-Pane Orchestration
The true power of Nexus lies in its flexible layout engine, allowing you to build the exact dashboard you need for your engagement.
- Side-by-Side Editing: Open multiple pages simultaneously. You can have the Chronos on the left for reference while drafting your report on the right.
- Drag-and-Drop Organization:
- Open from Atlas: Drag any document from the Atlas and drop it into the Nexus zone.
- Positioning: Drop a page on the left or right edge of an existing pane to split the view. A blue indicator will show you exactly where the new pane will snap.
- Independent Resizing: Hover between panes to find the resizer handle. Each pane can be independently adjusted to maximize your screen real estate.
- Persistent Layout: Noust automatically remembers which pages you had open, the sidebar collapse state (
NEXUS_IS_SIDEBAR_COLLAPSED), and the Nexus panel width. Changes dynamically trigger a settings auto-save and synchronize with cloud configuration. - PDF Export: Export your free-text pages as professional PDF documents.
- Printer Friendly: The export uses a specialized white-themed layout for printing efficiency while preserving the dark aesthetic for code blocks.
- Zero-Server: PDF generation is performed entirely in your browser to maintain your privacy.
- Interaction: Click the PDF icon in the header of any Nexus document to trigger the export.
Navigation Tip
The Chronos will always remain open as your "home base" if it is the only pane active. To close it, you must have at least one other free-text page open. You can also quickly toggle the entire Nexus sidebar using the Alt + V shortcut.
Nexus Objectives
The Objectives system allows you to define, track, and link project goals directly within your current section. Like notes and timelines, objectives are section-scoped, meaning each tab maintains its own independent set of goals and associated note links. This provides a bridge between high-level task management and the raw information in your notes without cluttering other engagement phases.
- Goal Tracking & Ordering: Create objectives with deadlines. Use the built-in date stepper to quickly adjust timelines, click the Sort by Deadline button to organize active goals, or reorder goals manually via Drag and Drop when no filters or deadline sorting are active. Drag objectives to the In Progress section at the top to track your current focus separate from active goals, where active flag filters organize matching goals first without hiding non-matching ones. The sorting preference is saved per-section and remains active permanently until toggled off. New objectives are initialized with Flow deactivated by default.
- Objective Priority: Toggle the star icon on any active objective to prioritize it. Prioritized objectives are pinned to the top of their respective lists (Active or In Progress). Drag-and-drop boundaries ensure that non-prioritized objectives cannot be dragged above prioritized ones, though manual sorting within the same priority tier is allowed.
- Quick Objective: You can link a note to an objective or create a new objective directly from the note's floating context sidebar. This automatically links the note to the new goal, allowing you to turn ideas into actionable tasks instantly.
- One-to-Many Linking:
- One Objective, Multiple Notes: A single objective can be supported by several notes within the same section.
- One Note, One Objective: To maintain logical clarity, each note can only be linked to one primary objective at a time. Linking a note to a new objective will automatically remove it from the previous one.
- Visual Status: Each objective features a progress checkbox. Completed goals are visually dimmed to keep your focus on active objectives.
- Note Linking (Targeting Mode):
- Click the Target icon on an objective to enter Targeting Mode.
- Smart Navigation: The workspace will automatically zoom out (60%) and center on your Anchor, providing a perfect overview to locate relevant notes.
- Interactive Linking: Simply click any note on the canvas to link or unlink it from the active objective.
- Quick Exit: Press
Escor click the target icon again to exit Targeting Mode.
- Two-Way Interaction:
- From Nexus to Canvas: Each objective lists its linked notes. Click "Go to note" to instantly center the canvas on that specific note.
- From Canvas to Nexus: Active or hovered notes display a floating context sidebar. Click the Objective icon in this sidebar to open the Nexus and highlight the corresponding objective, or use the Flow icon to toggle its visibility on the Flow Visualization board.
- Sidebar Editing: Expand any linked note in the sidebar to edit its Title or Content in real-time. Changes are instantly synchronized with the canvas note.
- Integrated Flag Management: Click the flag icon next to the sort button in the Objectives header to toggle the flag configuration panel. You can create, edit, color, import, or export section-scoped category flags, automatically synchronizing changes with the Flow Visualization board.
- Dynamic Minimap: When the Nexus is open, the Mini-Map automatically slides to the left to remain visible. If you expand the Nexus to cover most of the screen, the Mini-Map will gracefully hide to preserve space.
Nexus Flow Visualization
The Flow Visualization system provides an interactive, visual flowchart of your milestones and objectives. This helps you track progress, define dependencies, and visualize chronological patterns across your engagement phases.
Activating Flow Mode & Layout Integration
To enter the Flow view, click the Flow button inside the Nexus side pane header. You can customize how the Flow board integrates with your workspace by using the mode selector in the header:
- Canvas Mode: Toggles the central workspace, replacing the 2D notes canvas with the interactive Flow Visualization board.
- Nexus Mode (Embedded): Embeds the Flow Visualization directly inside the Nexus editor sidebar pane, keeping the 2D notes canvas completely visible and editable on the main screen.
Your preference is saved to your local workspace settings and persisted across sessions.
Organization Modes
- Achievement Path: A chronological path showing milestones sequentially based on the order in which they were completed.
- Lifecycle Trace: Traces the entire duration of milestones and objectives from their start date to their completion date, highlighting overlaps and parallel tracks.
- Swimlanes: Groups milestones into dedicated swimlanes based on their assigned parent category flags.
Chronological vs. Manual Ordering
By default, milestones in the Flow view are organized chronologically, respecting the dates set on their corresponding cards. However, you can drag and drop cards to manually adjust their sequential order. When you manually reposition cards, the custom layout order takes precedence. Users should be aware that this can result in dates appearing out of chronological order on the visualization path.
Workspace Interactions
- Card & Swimlane Drag-and-Drop:
- Reordering Swimlanes: Drag and drop category headers or swimlanes to reorder the layout sequence.
- Reordering Cards: Drag and drop milestone cards to manually adjust their sequential order.
- Cross-Category Assignment: In Swimlanes mode, dragging a card from one swimlane and dropping it into another dynamically updates the card's flags to match the new parent category or subcategory, streamlining task classification.
- Intelligent Flag Grouping: Milestones tagged with multiple flags are intelligently grouped into the parent flag representing the latest phase in the sequence (e.g. prioritizing "Initial Access" over "Recon").
- Milestone Insertion: Insert new manual milestones inline by clicking the '+' button on the connection paths between cards. When a card is the last or only card in a sequence, a '+' button automatically appears in front of it (following a short dashed line) to allow convenient continuation of the path.
- Dynamic Category Color Propagation: In the Swimlanes mode, connection lines, milestone tags (
objorms), and insertion buttons (+) dynamically inherit the color code of their parent category, facilitating visual segmentation.
Flow Analytics
The Flow Analytics engine provides chronological and categorical breakdown analysis of your milestones and objectives. You can launch it by clicking the Analytics icon in the Flow header.
- Phase Breakdown: Displays a visual breakdown of active milestones per lifecycle phase and category flags, tracking how tasks are distributed across your workflow.
- Statistical Overview: Summarizes completed objectives, active milestones, and category counts to measure project progression in real-time.
Document Integration (/flow Command)
You can embed your dynamic Flow visualizations directly into Nexus free-text documents to enrich your reports:
- Insertion: Type
/flowin any Nexus free-text page to open the inline picker and select the flow to embed. You can choose from 8 layout configurations directly in the popup, including Achievement Path, Lifecycle Trace, or one of the 6 permutations of Categorized Swimlanes. - In-Place Editing: Select an embedded flow snapshot to display a configuration gear button in its resizer toolbar. Clicking this button opens the layout mode selector to let you change layout configurations in place.
- Alignment & Sizing: Once inserted, select the flow snapshot to resize it dynamically using handles, or align it (Left, Center, Right) using the floating image toolbar.
- Undo / Redo Support: All operations on embedded flows (insertion, resizing, alignment, drag-to-reorder, and deletion) are fully integrated into the browser's native history stack, allowing seamless Undo (
Ctrl+Z) and Redo (Ctrl+Y) operations.
Intel Board (Link Visualization)
The Intel Board is an interactive graph visualization and relationship mapping engine that transforms your workspace notes, clusters, and subsections into a dynamic visual intelligence map. It allows you to analyze connections, map investigative trails, and visualize dependencies without altering your original canvas layout.
Activating Intel Mode & Board Visualization
- Intel Header Action: Click the Intel button in the top header action bar (or press
Alt+I) to enable Intel mode on your workspace. - Floating Toolbar & Modes: When Intel mode is active, a floating toolbar appears on screen:
- Linking Mode: The default state for creating and managing connection lines between notes. The floating toolbar displays an Open Intel Board button.
- Intel Board Mode: Click Open Intel Board on the floating toolbar to transition into the auto-arranged graph visualization mode. In this mode, the floating toolbar updates to show:
- Linking Mode: Click to exit Intel Board mode and return to standard Linking Mode.
- Reset Layout: Click to clear all custom manual drag positions and restore the automated graph layout structure.
Relationship Mapping & Linking
- Octagon Connection Handles: In Linking Mode, each note card and cluster container displays a visual Octagon Handle that serves as the interactive anchor for relationship paths.
- Visual Connection Lines: Click and drag directly from a note's octagon handle to another note's handle to render dynamic, curved SVG relationship lines complete with directional arrowheads.
- Cross-Section Connections (Alt + Click): To connect elements across different workspace section tabs:
- Hold
Alt+ Click directly on the Octagon Handle of one or more source notes/clusters in your active section. A floating HUD display will highlight the pending source nodes. - Switch to any target section tab.
- Click the Octagon Handle of a target note or cluster in that section to establish the cross-section relationship line instantly.
- Hold
- Link Management & Re-dragging: Click any existing connection line to inspect relationship details or remove it instantly. Dragging an existing connection line allows you to re-assign the relationship path to a new target node.
Automatic Graph Layout Engine
- Structured Grouping: Intel Board automatically groups notes under their respective subsection headers and clusters, organizing them into readable, structured component streams.
- Overlap Prevention: The graph layout engine automatically calculates spatial bounds and vertical spacing, ensuring that titles, note cards, and clusters never overlap or obscure each other.
Custom Positioning & Graph Manipulation
- Drag & Drop Reordering: Click and drag any subsection title, individual note, or cluster to reposition it anywhere on the board.
- Title-Anchored Flow: When a subsection title is moved, its associated notes dynamically anchor to the new position, keeping related information cleanly grouped together.
- Independent Undo / Redo: Intel Board maintains its own dedicated history stack. Use
Ctrl+ZandCtrl+Ywhile in visualization mode to undo and redo board movements and link modifications without affecting standard canvas undo steps. - Reset Layout: Click the Reset Layout button in the floating toolbar at any time to clear custom board positions and restore the automated graph structure.
Topology Canvas
The Topology Canvas is an interactive, visual diagramming engine designed to map network infrastructures, data flows, threat models, or execution paths. It is fully integrated with your workspace notes and sections.
Diagram Lifecycle & List View
The Topology Canvas supports maintaining multiple diagrams per workspace:
- Diagram List: When you open the Topology workspace, you are greeted with a list of all your created diagrams, allowing you to create new ones or open existing ones.
- Automatic State Reset: Closing the Topology pane (by clicking
X) or switching to another Nexus tab resets the active diagram state. When you re-open the Topology pane, it starts fresh at the list view rather than forcing you back into the last active diagram. - Data Persistence: Diagram configurations and states are automatically saved to your workspace storage.
- Export & Import of Labels: Hover over any diagram list item to access the Export Labels (download icon) and Import Labels (upload icon) actions. This allows backing up, restoring, or sharing customized label definitions (names and colors) using standard secure
.npadpackages (with AES-GCM encryption) or fallback.jsonformats.- Merge: Adds imported labels to the diagram's existing set without name duplicates (case-insensitive).
- Replace: Overwrites all labels. Automatically filters and clears references on nodes to labels that no longer exist to prevent dangling references.
- Safety Protections: Enforces a 5MB maximum file size limit, truncates label names to 100 characters, limits imports to 500 labels, and prevents ID collisions to maintain system integrity and smooth SVG canvas performance.
Node Management & Customization
Nodes are the building blocks of your topology diagrams.
- Node Creation: Press
Alt+Qinside the topology workspace to instantly spawn a new node. - Predefined Shapes: Choose between three structural shapes to represent different assets or concepts:
- Card (Rectangle): Ideal for hosts, servers, or general notes.
- Circle: Great for routers, gateways, or key events.
- Octagon: Perfect for decision points, firewalls, or endpoints.
- Representing Notes: Double-click any node to link it directly to a workspace note.
- Linked nodes display a dedicated note icon indicating their relationship.
- Double-clicking a linked note (or double-clicking a note representation on an expanded node) instantly opens and centers the corresponding note in the canvas. If the Topology Canvas is in Overlay Mode, it automatically closes to show the note. If it is in Embedded Mode (inside Nexus), the sidebar remains open.
- Labels & Tags: Tag nodes with multiple custom-colored labels to indicate severity, status, or asset class. Labels are displayed dynamically inside the node or via an elegant tooltip.
Notes Sidebar (Drag-and-Drop Creation)
An interactive side drawer lists all the available notes in your current section, allowing for seamless note-to-node mapping.
- Filter by Section: Use the section pill buttons at the top of the sidebar to filter the list and show notes belonging to other workspace sections.
- Drag-to-Create: Drag any note from the sidebar and drop it directly onto the topology canvas to instantly create a node pre-linked to that note.
- Multi-Select Dragging: Click multiple notes in the sidebar list to select them (highlighted with a colored border). Dragging any of the selected notes drags all of them together. Upon dropping them onto the canvas, they are created as individual nodes automatically arranged in a horizontal line with a
220pxspacing. - Interactive Mapping: You can also select a note to link from a dropdown when configuring any standard node on the canvas.
- Real-Time Synchronization: Any changes made to note titles (whether typed manually or generated programmatically via the auto-title engine) are propagated instantly to the sidebar note list and all corresponding nodes in the active topology diagram.
Connections (Directional Edges)
Link nodes together to illustrate communication paths or data flow.
- Drawing Connections: Hover over a node to reveal connection handles on all four sides. Click and drag from any handle to another node to establish a directional line.
- Curved Routing & Detours: Lines are drawn as smooth Bezier curves. If a line would cross under or over a node, the routing engine automatically calculates a detour, curving the path around the node to preserve diagram readability.
- Directional Indicators: Edges show direction using built-in arrowheads to represent the flow of information.
- Edge Label Unification: Redundant edge labels (sharing the same label and starting/ending at the same handle) can be unified into a single visual label by hovering over the line and clicking "Unify". The unified label automatically synchronizes any title edits across all member connections, and hovering over it reveals a "Separate" button to undo the grouping.
- Shared Segment Label Positioning: Unified labels are automatically positioned on the shared straight-line segment (exactly 16px from the T-junction where the lines merge). The label is mathematically centered on the line's axis, keeping it clear of arrowheads or node handles.
- Link Nodes in Series: Select two or more nodes on the canvas and press
Alt+S(or use the button in the floating selection toolbar) to connect them in series. The system automatically sorts the selected nodes based on their positions (from left-to-right for horizontal layouts, and from top-to-bottom for vertically aligned nodes within a20pxthreshold) and links them sequentially.
Node Grouping (Clusters)
Organize complex networks by grouping nodes into defined zones.
- Cluster Creation: Select two or more nodes (using
Ctrl+Clickor box-selection) and pressAlt+Eto group them into a cluster. - Visual Boundaries: Clusters are represented by colored, labeled bounding boxes that automatically resize to contain all their member nodes.
- In-Place Title Editing: Double-click a cluster's header to edit its name directly using in-place text input. Press
Enteror click outside to save the new title, or pressEscapeto cancel and revert changes. - Linking Notes to Clusters: You can link one or more workspace notes directly to a cluster (rather than to individual nodes). Linked notes are displayed as distinct glassmorphic badges inside the cluster body and can be removed instantly using their quick-unlink button.
- Color & Style Propagation: Nodes positioned inside the boundaries of a cluster automatically inherit the cluster's accent colors (background, borders, shadows, and hover transitions) to maintain a cohesive visual identity.
- Cross-Cluster Connections: Nodes grouped inside different clusters can be connected directly to map complex cross-zone communications.
Smart Layouts (Tidy Up)
Keep your diagrams clean and structured without manual micro-management.
- Tidy Up: Press
Alt+Wto trigger the layout algorithm. It automatically detects node chains and aligns them horizontally or vertically with consistent spacing. - Node Pinning (Locking):
- To prevent a node from being automatically rearranged by the Tidy Up engine, click the Pushpin icon in its corner.
- Visual Indicator: Pinned nodes display a filled green (or cluster-colored) pin icon.
- Layout Anchors: Pinned nodes remain locked in their manual coordinates during Tidy Up, serving as fixed alignment anchors that the remaining free nodes align to.
Smart Guides & Magnetic Snapping
To improve alignment precision when designing diagrams, the topology canvas implements a smart alignment engine:
- Magnetic Snapping: When dragging any node or cluster, it automatically snaps to the borders or centerlines of neighboring elements (both nodes and clusters) within a
6pxthreshold, dynamically adjusted for the current zoom scale. - Dynamic Smart Guides: SVG alignment guides are rendered on the canvas showing which edges or centers are currently aligned.
- Floating Distance Badges: Elegant floating labels display the exact pixel distance between aligned components. These badges float above the canvas selection outlines to remain completely readable at any zoom level.
Interaction & Selection
- Multi-Select: Hold
Ctrland click individual nodes, or holdCtrland drag a selection box over the background to select multiple nodes. - Harmonic Multi-Selection Drag: Dragging any element within a multi-selection moves all selected nodes and clusters concurrently as a single cohesive unit, maintaining their relative offsets. Sub-clusters and their contained nodes are automatically moved together, preserving the canvas selection state throughout the motion.
- Floating Selection Toolbar: When two or more nodes are selected, a floating actions toolbar appears at the top center of the selection. It provides quick buttons to Create Cluster (Alt+E) or Link Nodes in Series (Alt+S).
- Canvas Navigation: Pan and zoom inside the topology view using the same smooth navigation controls as the main Noust workspace.
Layout Integration Modes
Similar to the Flow system, the Topology Canvas supports two layout integration modes:
- Overlay Mode: Replaces the central 2D notes canvas workspace with the interactive Topology Canvas.
- Embedded Mode: Embeds the Topology Canvas workspace directly inside the Nexus editor sidebar tab, allowing you to diagram alongside your canvas notes.
Topology Analytics
The Topology Analytics engine provides deep structural insights and metrics about your network topology and communication paths. You can launch it by clicking the Analytics icon in the Topology sidebar.
- Scope Selection: Analyze a single active diagram or select multiple diagrams concurrently to calculate aggregate statistics (total diagrams, nodes, edges, clusters).
- Include Hashtags: Toggle the option to "Include hashtags from linked notes". When enabled, the analytics engine automatically parses both the title and the HTML content of all notes linked to nodes/clusters, extracts hashtags (e.g.
#firewall,#vulnerability), and aggregates them alongside node labels.
Analytical Charts & Metrics
- Label Frequency Chart: Renders a dynamic, clean SVG horizontal bar chart visualizing the top 8 most frequent node labels and hashtags in the selected scope.
- Cluster Correlation: Generates distributions representing label occurrences per defined cluster, displaying absolute occurrences and percentages to visualize asset/threat densities within security zones.
- Label Co-occurrence Selector: An interactive query card showing nodes that share multiple selected labels/hashtags. It displays match counts and allows you to highlight the matching nodes directly on the canvas.
- Connection Path Correlation: Computes and displays the top 5 most common directional path patterns (e.g.,
Source Label ➔ [Edge Label] ➔ Target Label) and allows highlighting these paths on the active diagram.
Document Integration & Inline Charts
You can embed your interactive Topology charts directly into Nexus free-text pages to enhance your reporting:
- Copying Embeds: Click the Copy Embed button on any frequency or correlation chart in the Analytics panel. This copies an embed code like
[topology-chart:<scope>:<type>](where type islabel-freqorcluster-dist) to your clipboard. - Rendering & Interaction: Paste this tag into any Nexus free-text document. Noust dynamically resolves and renders it as an interactive, styled chart. You can align these inline charts (Left, Center, Right) or resize them using standard layout handles.
Flag Management & Collision Prevention
A unified and robust flag management system is shared across both the Nexus Objectives and Flow modules (available in the main Flow settings pane, sidebar panel, and floating setting panel):
- Unique Name Generation: When adding a new flag, the system automatically assigns a unique placeholder name (e.g.,
New Flag,New Flag 2, etc.) to prevent immediate naming collisions. - Case-Insensitive Duplicate Prevention: Renaming any flag performs a strict, case-insensitive check against all existing flags in the section. If a duplicate name is entered or if the field is left empty, the change is rejected, the input is reverted, and an error notification is shown to the user.
- Auto-Deduplication during Import: When importing flags from JSON, the import pipeline parses and sanitizes the labels, and automatically appends incremental counters to any duplicate names detected in the file to guarantee a conflict-free set of flags.
Note Interaction & Layout
Full control over how your documentation is organized visually on the canvas.
Multi-Select & Dragging
Use Ctrl + Click or simply hold Ctrl and drag your mouse over to select and move multiple notes at once. The primary note acts as an anchor for alignment guides and snapping, making it easy to reposition entire clusters of information while maintaining their relative layout.
To quickly move a single note without having to click specifically on the header, hold Alt and drag with the Right Mouse Button from any part of the note (including the text content). This overrides standard text editing to prioritize movement.
Note Context Sidebar
Hovering or focusing on any note reveals a floating context sidebar on its right edge. This sidebar houses quick-access tools:
- Objective (Target Icon): Allows linking or unlinking the note to an objective, opening the Nexus, and highlighting the linked goal.
- Flow (Flow Icon): Toggles whether the note's objective/milestone is visible on the Flow Visualization board.
Custom Context Menus
To improve navigation, workspace flow, and productivity, Noust provides custom context menus on right-click for both the empty canvas background and individual notes. These menus replace the standard browser right-click menu, except when Alt or Shift is pressed (preserving the native browser menu and the Alt + Right Click Session Anchor gesture).
- Canvas Context Menu: Right-click on empty canvas areas to access quick actions:
- Add Note: Creates a text note at the clicked coordinates.
- Add Image Note: Prompts the user to pick an image file and places it at the clicked coordinates.
- Paste Clipboard as Note: Instantly reads clipboard contents and creates either a text note or an image note at the target coordinates.
- Set Anchor Point: Sets the section anchor at the clicked coordinates.
- Center View Here: Smoothly scrolls and centers the viewport at the clicked coordinates.
- Reset Zoom: Smoothly transitions the zoom level back to your configured base zoom (e.g., 80%).
- Note Context Menu: Right-click on any note card to trigger actions:
- Link/Unlink from Objectives: Link or unlink the note from Objectives.
- Add/Remove from Flow: Toggle the note's visibility on the Flow board.
- Copy Content: Copies the note's textual content (or copies the image blob for image notes).
- Toggle Collapse: Expands or collapses the note.
- Delete Note: Triggers note deletion.
- Collision-Aware Placement: When placing notes via the canvas context menu, a spiral search algorithm checks for overlaps with other elements (notes, subsections, clusters) and automatically finds the nearest non-overlapping position.
- Settings Toggle: In the Settings -> Behavior menu under Note Interaction & Flow, you can toggle the
Hover Note Context Menusetting. When enabled, the float buttons appear on note hover/focus. When disabled, these float buttons are hidden, and users access flow and objective linking exclusively via the right-click menu.
Standalone Canvas Image Notes
Instead of inserting images inline inside normal text notes, image notes are created as first-class, standalone cards directly on the canvas. They possess a header with an editable title, resize handles, and can be moved, selected, clustered, and connected using the Intel Board (workspaceEdges).
Chronology Integration: Image notes can be integrated into the Chronos timeline. In Automatic mode, they receive a creation timestamp automatically. In Manual mode, right-click the image note and select Assign Timestamp to register it on the timeline.
Lazy Loading: Image notes fetch decrypted binary payload data from IndexedDB, caching it in memory only when active to preserve system performance.
Image Drawing & Annotations: Image notes feature a dedicated floating toolbar directly above them for freehand sketching, straight lines, arrows, and circles. Annotations are saved as vector strokes inside the note data and are synchronized automatically to IndexedDB.
- Drawing Mode Toggle: Dragging the note is automatically disabled while in drawing mode so you can paint without accidentally moving the note.
- Dynamic Theme-Based Colors: Choose from 5 preset colors dynamically matching your workspace theme, or use the color picker displaying an HSL color spectrum containing strictly authorized theme colors.
- Undo Support: Easily undo the last drawing stroke using the Undo button in the toolbar or pressing Ctrl + Z inside the note.
Copy Options: Right-clicking an image note provides two copy features:
- Copy Content: Merges the original image with your drawings and exports the combined result directly to your clipboard as a PNG image.
- Copy Original Image: Copies only the original uploaded image to your clipboard, without any drawings.
Drag, Resize, & Lightbox: Image notes can be moved and resized normally. Double-clicking on an image note triggers a premium glassmorphic lightbox viewer containing the high-resolution image and its title.
Clipboard & Drop Support:
- Drag & Drop: Dragging and dropping image files from your operating system directly onto the canvas creates image notes at the exact drop coordinates.
- Paste: Pasting an image from your clipboard (
Ctrl+V) while focused on the canvas (outside text entry) automatically creates an image note at the current mouse position.
Proportional Aspect Ratio: When creating an image note from a file, the system automatically measures the image dimensions and downscales large files to fit within a maximum bounding box of 350x300px while maintaining the natural aspect ratio.
Note Clusters (Visual Grouping)
In addition to dynamic subsections, you can manually group notes together into Clusters to organize complex data visually on the canvas.
- Cluster Creation: Select two or more notes (using
Ctrl+Clickor box-selection) and pressAlt+Cto group them into a cluster. - Visual Boundaries: Clusters create a distinct, dashed boundary around your notes with an editable title.
- Smart Reflow: Creating a cluster automatically pushes unselected overlapping notes out of the way, ensuring a clean grouping without manual repositioning.
- Cluster Movement: Dragging a cluster automatically moves all its member notes together as a single unit, maintaining their relative positions.
Collapse & Flow Logic
Click the arrow in the note header to toggle its height. Notes directly below will be automatically pulled up or pushed down to maintain the layout.
Noust implements a specialized layout engine known as Unity of Organization. This system ensures that your notes behave as a cohesive group rather than isolated elements. It understands the spatial relationship between your notes and applies movement recursively.
The Cluster Chain Reaction
Unlike standard layout engines that only look at direct collisions, the Unity of Organization triggers a recursive cluster reaction:
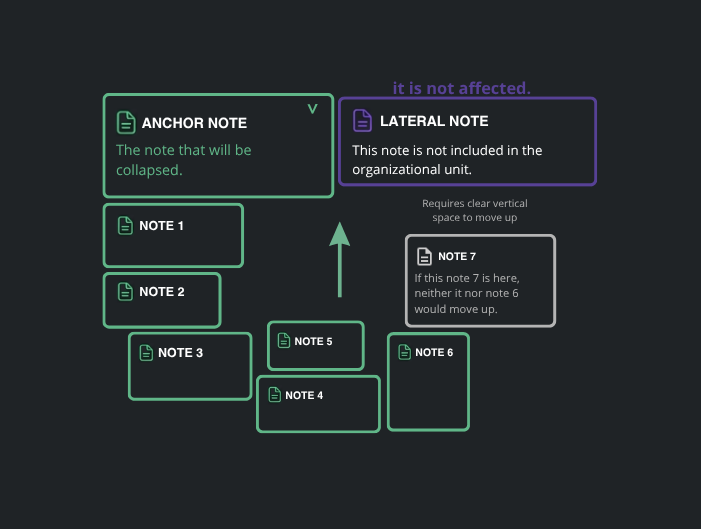
- The Anchor Note: The note you are directly toggling acts as the Anchor. It only triggers movement for notes directly within its vertical path. Any notes spatially to the side of the Anchor (like the Lateral Note in the diagram) remain Isolated.
- Recursive Propagation: Once a note is triggered into movement (like Secondary Note 1), it becomes part of a Moving Cluster.
- Omnidirectional Flow: For every note in a Moving Cluster, the Unity of Organization applies to all surrounding notes (below, left, or right) that fall within its proximity range.
- Group Integrity: This ensures that entire structures—even those with complex horizontal and vertical arrangements—stay together as a single logical unit. Notice how the entire cluster of notes moves together because they are nexus or horizontally linked to the moving chain.
Visualizing Unity of Organization
The diagram below illustrates how a Note Collapse in the Anchor Note triggers a cascading pull throughout the cluster. Notice how the Lateral Note remains isolated due to being outside the Anchor's vertical path, while the entire cluster of green notes moves upward as a single unit to fill the space.
Configuration
The logical distance that defines which notes belong to a Unity of Organization can be adjusted in Settings > Behavior.
Note Interaction Settings
- Toggle Proximity: Adjust the range at which notes are considered "linked." Increasing this value makes the layout engine more sensitive, grouping notes that are further apart into the same organizational unit.
- Collapse Auto-Flow (Org): Enable or disable the automatic movement of surrounding notes when collapsing/expanding. Disabling this allows for purely local note resizing without affecting the rest of the workspace.
Pull Up on Delete
To prevent leaving empty vertical gaps on the canvas when a note is deleted, Noust includes a layout optimization feature for stacked lists (such as collapsed notes placed one below the other).
- Contiguous Stack Detection: When a note is deleted, the layout engine scans for notes directly below it in the same section. If a vertically aligned stack (with a vertical gap of $\le 24\text{px}$) is detected, a floating action button is displayed at the position of the deleted note.
- Floating Action Toolbar: Matches the design of the cluster creation toolbar. It features a compact circular button with a double-chevron up icon. Hovering over it displays the tooltip: Pull Up Notes Below.
- Interaction & Reflow:
- Clicking the button or pressing the
Altkey while the prompt is active shifts all notes in the stack upwards to fill the gap, using a hardware-accelerated reflow animation. - The action is non-blocking. Clicks elsewhere on the canvas, pressing the
Escapekey, or waiting for 6 seconds of inactivity automatically dismisses the button, leaving the layout unchanged.
- Clicking the button or pressing the
- Undo Support: The layout adjustment is fully integrated into the history system, enabling you to undo the pull-up action (
Ctrl+Z) at any time.
Auto-fitting
If you drop a note into a tight spot, Noust will attempt to resize it to fit the gap. This triggers only if the note content is short (≤ 80 characters) and the available area is at least 40% of the original size, ensuring that high-density data like IPs or IDs can be neatly tucked into the layout without manual adjustment.
Focus Note
If a note is partially off-screen, click it to bring it into full view. This is essential for quickly centering your focus on specific data points during high-pressure projects.
Configuration
The focus behavior can be adjusted in Settings > Behavior.
Focus Settings
- Focus Scroll Offset: Customize the vertical safety margin used when centering a note that has been focused.
Alignment & Spacing
While dragging, vertical and horizontal lines appear to help align the note with others. Notes will "snap" to positions that maintain consistent spacing.
Configuration
Global spacing between notes is managed in Settings > Behavior.
Spacing Settings
- Note Margin: Define the global external margin for all notes to ensure consistent breathing room between your content blocks.
::: important Organization Link Integrity To ensure that the Unity of Organization logic works correctly, the Note Margin is logically restricted and cannot exceed the Toggle Proximity value. This prevents the visual gap from becoming larger than the distance the layout engine uses to identify connected notes. :::
Logical Segmentation (Subsections)
Subsections allow you to create structured logical boundaries within your workspace, perfect for separating different phases of a penetration test, organizing infrastructure components, or grouping related data blocks visually without needing multiple sections.
Creation & Generation
Subsections can be created manually or generated dynamically based on your note layout:
- Manual Creation: Hold
Shiftand drag your mouse on any empty background area to draw a subsection manually. The orientation (horizontal or vertical) is determined dynamically based on the direction of your drag. - Dynamic Suggestions: When you position notes near each other, Noust detects a "corridor" of free space. A preview line will appear, suggesting a logical division.
- The Boundary: The length and position of a subsection are determined by the "boundaries" of surrounding notes or other existing subsections. Proximity logic ensures that lines snap perfectly to the edges of your content.
- Intersection: You can overlap vertical and horizontal lines. The system intelligently handles intersections, allowing you to create grids or complex organizational matrixes.
Configuration
The Subsection system is highly customizable and can be adjusted or disabled in Settings > Behavior.
Subsection Settings
- Suggestions Enabled: Toggle the entire dynamic discovery system. When disabled, existing subsections remain, but no new corridors will be detected.
- Horizontal/Vertical Lines: Choose which axes should trigger auto-discovery. Perfect for users who only want to cross-section their workspace in one direction.
- Min Suggestion Length: Adjust the sensitivity of the discovery algorithm. Higher values prevent shorter lines from appearing, reducing visual noise in high-density areas.
Interaction & Manipulation
Once created, subsections become permanent parts of your workspace unless deleted:
- Drag & Position: Click and hold the drag handle (the circle grid icon) to move the line. It will snap to other corridors as you move it.
- Resizing: Use the handles at both ends of the line to adjust its length manually.
- Expansion Arrows: Click the arrows at either end to automatically grow the line to the next available boundary (the edge of a note or another subsection).
- Multi-Selection & Group Dragging: Hold
Ctrland click subsections and notes to group-select them, or holdCtrland drag a selection box over the empty canvas background to select multiple notes at once. Once selected, dragging any element in the group will move all selected notes and subsections concurrently in any direction. Snapping is automatically bypassed during group drags to prevent layout stuttering. PressingDeletewill remove all selected notes and subsections from the canvas and data model.
Atlas Integration
To facilitate exploration and navigation in massive 2D workspaces, subsections with custom titles are indexed in the Atlas.
- Jump to Subsection: Click on a subsection in the Atlas to instantly center your view on it.
- Auto-Discovery Toggle: If your workspace becomes too dense, you can choose to hide subsections from the Atlas list via Settings > Behavior > Show Subsections.
Style & Preferences
You can customize the visual signature of every subsection via its context menu:
- Styles: Choose between Solid or Dashed lines.
- Title Placement: Position the title Over the line (acting as a mask), to the Side, or hide it completely.
- Title Orientation: Rotate the title to be Horizontal or Vertical to match your layout's aesthetic.
- Global Persistence: Unlike note content, style preferences for subsections (colors, thickness, opacity) are stored as Global Behavior Settings. This means your preferred styling is persisted immediately across sessions via the settings auto-save system.
Selection Privacy
Subsection titles are fully editable. To ensure you can quickly copy or edit data, the drag controls are automatically hidden when your mouse is over the title, prioritizing text selection and content modification.
Automatic Title Generation
Noust can automatically generate titles for your notes based on the first lines of content, ensuring your workspace stays organized without interrupting your flow.
Logic & Prioritization
The app monitors your typing and automatically extracts the most relevant words based on these prioritization rules:
- First Line: If the first line is short and clear, it is prioritized as the primary source.
- Tech Keywords: Specialized terms (e.g.,
CVE,API,IP,SQLi) act as anchors and are more likely to appear in the title. - Capitalization: Words starting with Uppercase letters are given higher priority by the algorithm.
- Common Words: "Stop words" (like the, a, of, in) are ignored to keep titles concise.
Performance Tip
Knowing that capitalized words are prioritized, you can intentionally capitalize specific terms you want to see in the title to optimize your workflow.
Configuration
The title generation algorithm can be fully customized or disabled in Settings > Behavior.
Title Generation Settings
- Enabled/Disabled: Toggle the entire automatic generation system on or off.
- Word Limit: Set the maximum number of words allowed in the generated title.
- Generation Delay: Control how frequently the algorithm runs while you are typing to prevent excessive processing.
Text Formatting & Blocks
Noust supports powerful markdown-inspired formatting for technical clarity.
Visual Customization
Apply one of four predefined colors to individual notes (Shortcuts: Ctrl + 1 to 4) or use a custom color-picker color (Ctrl + '). This allows for color-coding projects based on severity or topic.
Interactive Blocks
Noust recognizes several markdown patterns instantly:
- Lists: Type
*for bullets or1.for numbered lists. - Checkboxes: Type
<to create interactive to-do items. - Toggle Blocks: Type
>to make content collapsible. - Horizontal Lines: Type
---followed byEnterto create a titled separator.
Toolbar Conversions
Select any text and use the toolbar buttons to format entire blocks line-by-line, converting raw text into lists or checklists instantly.
Floating Panels & Workspace Windows
Noust features a modular floating panel system for interactive workspace tools. Floating panels can be freely moved, resized, collapsed, or docked anywhere on the screen.
Window Architecture & Smart Edge Docking
- Free Movement & Resizing: Drag panels by their header handle and resize them from any edge or corner.
- Edge Docking & Smart Canvas Space:
- Full-Height Barriers (Auto-Zoom & Auto-Scroll): Global Canvas safe-area margins shrink only when stacked panels form a continuous barrier covering 90%+ of any edge (left, right, top, or bottom) of the available viewport, preserving maximum workspace space when panels are isolated.
- Collision Evasion (Anchor): The Anchor system detects panels touching top and left workspace edges as virtual wall barriers. When jumping to an anchor, the camera offsets the target note to stay clear of these panels with a safety margin, evaluating even single isolated edge-docked panels.
Floating Panel Tools
The following workspace features operate as floating panels:
- Environment Variables (
Vars): Define global key/value pairs (TARGET_IP=192.168.1.1) to evaluate and inject dynamic variables across code blocks and command templates. - Agent Chat: Interactive AI assistant panel to converse, analyze context-basket notes, and run prompt transformations.
- Technical Modules: Specialized utility windows (such as the JWT Analyzer and Encoder/Decoder) that can be enabled, toggled, and persisted dynamically.
Advanced Technical Modules
Technical modules built by and for security researchers. Optional modules (such as the JWT Analyzer and Encoder/Decoder) can be enabled or disabled dynamically through the application interface to customize your workspace scope.
Modules Management & Panel Grouping
You can toggle modules individually, organize them flexibly across floating panels, and customize their persistence preferences:
- Decouple to New Panel: Drag a module tab out of its current window to spawn a new, independent floating panel for side-by-side workspace comparison.
- Re-Group / Absorb: Drag a standalone module panel tab into another module container's tab bar to absorb it back into a unified multi-tab panel.
- Auto-save Modules: Automatically persist the enabled/disabled state of modules locally as you type.
- Cloud Sync Modules: Synchronize your active module configurations across devices securely.
These options can be toggled in Settings > Behavior.
Environment Variables
Set global key/value pairs (e.g., TARGET_IP=192.168.1.1) via the Vars icon. Use these variables in your templates to maintain consistent documentation and facilitate rapid command templating.
Variable Injection
When hovering over code blocks, a floating icon will appear. Clicking it copies content with all matching environment variables automatically evaluated and injected.
Easy Copy Mod
Toggle with Alt + C or the toolbar icon. Once enabled, selecting blocks turns them into fully clickable elements that instantly copy their content to your clipboard, perfect for moving data quickly between Noust and your terminal.
Storage & Persistence
Your data is handled with a privacy-first, local-first approach.
Session Security Shield
A Shield icon appears in the header to indicate your security status. The shield fills dynamically based on active protection:
- Left Side Filled: Local Encryption (At-Rest) is active.
- Right Side Filled: Cloud Auto-Sync is active.
- Fully Filled: Both Local Encryption and Cloud Auto-Sync are active.
- Empty Outline: The security password is set, but both features are currently disabled. Clicking the shield opens the Security Settings panel directly.
Session Persistence
Noust continuously saves your session (notes, sections, settings, variables) to browser local storage as you type, ensuring no data loss even without an internet connection.
Session History (Revisions)
Access past states of your workspace at any time via the History tab in the Menu Shell.
- Revision Snapshots: View automatically recorded session snapshots with precise dates and timestamps.
- Current Version Indicator: A pulsating green dot highlights the currently active session state.
- One-Click Restore: Click the Restore button on any past revision to roll back your entire workspace to that exact point in time.
Backup & Portable Data
Backup your entire workspace to a portable .npad binary package. This format supports embedded images and technical assets. Encrypting exports is strongly recommended for safe transport of sensitive technical engagement data.
Cloud Synchronization
Optional zero-knowledge synchronization allows you to access your notes across devices without compromising security.
Synchronization Details
The cloud synchronization security architecture is managed via your Settings and Sync controls.
Sync Security & Architecture
- Zero-Knowledge: Data is compressed and encrypted (AES-GCM 256-bit) locally in your browser before transmission. We never see your keys or your content.
- Collaboration: Share read-only access by username. Because sharing utilizes exact usernames indexed anonymously, user enumeration is completely prevented.
- Safe State Pushing: If you open a synchronized workspace but have not yet decrypted it locally, you can still perform a Push of your local un-synced notes. The system allows you to overwrite the locked cloud workspace (acting as a password reset) without decrypting. This protects your local progress from being accidentally lost during a decrypt action and avoids the need to spawn duplicate workspaces to save offline work.
- Desynchronize: Review shared workspaces and "sever" the link to keep a private offline copy instantly, allowing you to inherit a workable version of the shared data.
Chronology & Timestamps
Noust allows you to track the evolution of your notes over time, providing a clear audit trail of when specific information was added or modified. This system is available in both Canvas Notes and Nexus Free-Text Pages, ensuring a unified history across your entire workspace.
Temporal Blocks
When enabled, notes are visually divided into temporal blocks. Each block is identified by a dashed border and an interactive timestamp (citation) that appears in the top-right corner of the line.
- Block Identity: Every block tracks its creation and last modification time.
- Sub-blocks: If you return to an old block to make edits after the initial 60-second window, Noust tracks these as sub-blocks. Hovering over a citation (e.g.,
[1],[2]) in the text will update the temporal display to show that specific edit's timestamp.
Block Consolidation (Absorption)
To keep the history clean, Noust uses a sliding window of 60 seconds to decide whether new content should start a new block or be "absorbed" into the current one:
- Absorption: If you type or edit within 60 seconds of the block's last activity, the change is merged into the current block.
- New Block: If you wait longer than 60 seconds, the next interaction will naturally trigger a new chronological segment.
Operation Modes
You can customize how blocks are generated in Settings > Behavior:
- Manual Mode (Default): Use the
Alt+Tshortcut or the clock icon in the toolbar to manually consolidate the current text into a fixed block. - Image Notes: Unlike text-based notes, standalone image notes do not support text segment splitting. In Manual mode, you can manually add them to the timeline by right-clicking the note and choosing Assign Timestamp.
- Automatic Mode: Available for both Canvas Notes and Nexus Free-Text Pages. Noust monitors your typing flow and, after a configurable period of inactivity, automatically consolidates the current content into a timestamped block and prepares a new segment for your next input.
History Panel
Click on any timestamp indicator in a note to open the Lateral History Panel.
- Audit Trail: View a complete list of every modification block.
- Sub-block Details: See the exact time for every sub-step within a block.
- Copy Timestamp: Use the copy icon next to any entry to quickly get the precise ISO timestamp for your reports.
Configuration
Fine-tune the chronology engine in Settings > Behavior:
Chronology Settings
- Assignment Mode: Switch between Manual or Automatic block generation.
- Auto-Stamping Delay: In Automatic mode, set how many seconds of inactivity should trigger a block consolidation.
- Min Change Threshold: Define the minimum number of characters required to trigger a new entry, preventing visual noise from small corrections.
Agent Features
Noust includes a privacy-first, local-first Agent system that brings intelligent capabilities directly to your workspace.
Privacy-First Design
The Agent is disabled by default.
- Local Processing: When using local providers, your data never leaves your device.
- Cloud Processing: If you opt to use cloud providers, requests are sent directly from your browser to the provider's API.
- Key Safety: Your API keys are stored only in your browser's local storage and never transit through Noust's servers.
Provider Integration
Noust supports both local and cloud-based models:
- Browser: Leverages the browser's built-in AI capabilities. Runs entirely offline with zero configuration.
- Ollama: Connects to your local Ollama server to run private models (e.g., Llama 3, Mistral) locally.
- WebGPU (Soon): In-browser hardware-accelerated model execution.
- Gemini: Connects directly to Google's Gemini API for state-of-the-art cloud inference.
- OpenAI / Custom: Connects to OpenAI or any custom API that is compatible with the OpenAI API specification (such as Groq, LM Studio, or OpenRouter).
Configuration & Settings
You can manage the Agent from the sidebar panel:
- Master Toggle: Enable or disable the Agent entirely.
- System Instructions: Set global instructions that guide how the Agent behaves and formats its responses.
- Test Connection: Easily verify that your API endpoint and key are configured correctly before using the Agent.
Using the Agent
Once enabled, the Agent offers several ways to interact with your content:
1. Agent Chat & Context
The sidebar provides an Agent Chat interface where you can have conversations with the active model.
- Adding Context: You can target specific notes or pages by holding
Ctrland clicking on them to add them to the Agent's context basket. Alternatively, select any text within a note or page and pressCtrl+Lto immediately send it to the context basket. - Context-Aware Conversations: Type your prompt in the chat input. The Agent will analyze all files in the context basket to answer questions, write summaries, or perform analytical tasks.
2. Inline Selection Toolbar
When you highlight text in any note or page, the selection toolbar appears with quick Agent-powered actions:
- Summarize: Instantly generates a concise summary of the highlighted selection.
- Fix Grammar: Detects and corrects spelling and grammatical errors while preserving the style.
- Expand: Elaborates on the selected text to provide more detail and context.
3. Slash Commands & Proposed Diffs
You can execute commands directly inside notes or pages by typing a slash (/):
/replace [instructions]: Prompts the Agent to rewrite or edit the content. The Agent generates a proposed diff overlay with the following choices:- Insert: Inserts the proposed content below your selection without overwriting anything.
- Replace: Replaces either the selected snippet (if a snippet was highlighted) or the entire note/page.
- Reject: Discards the suggested changes.
/obj [instructions]: Instructs the Agent to analyze the selected context and automatically generate structured, actionable objectives (to-do check-lists) on the Nexus tab.